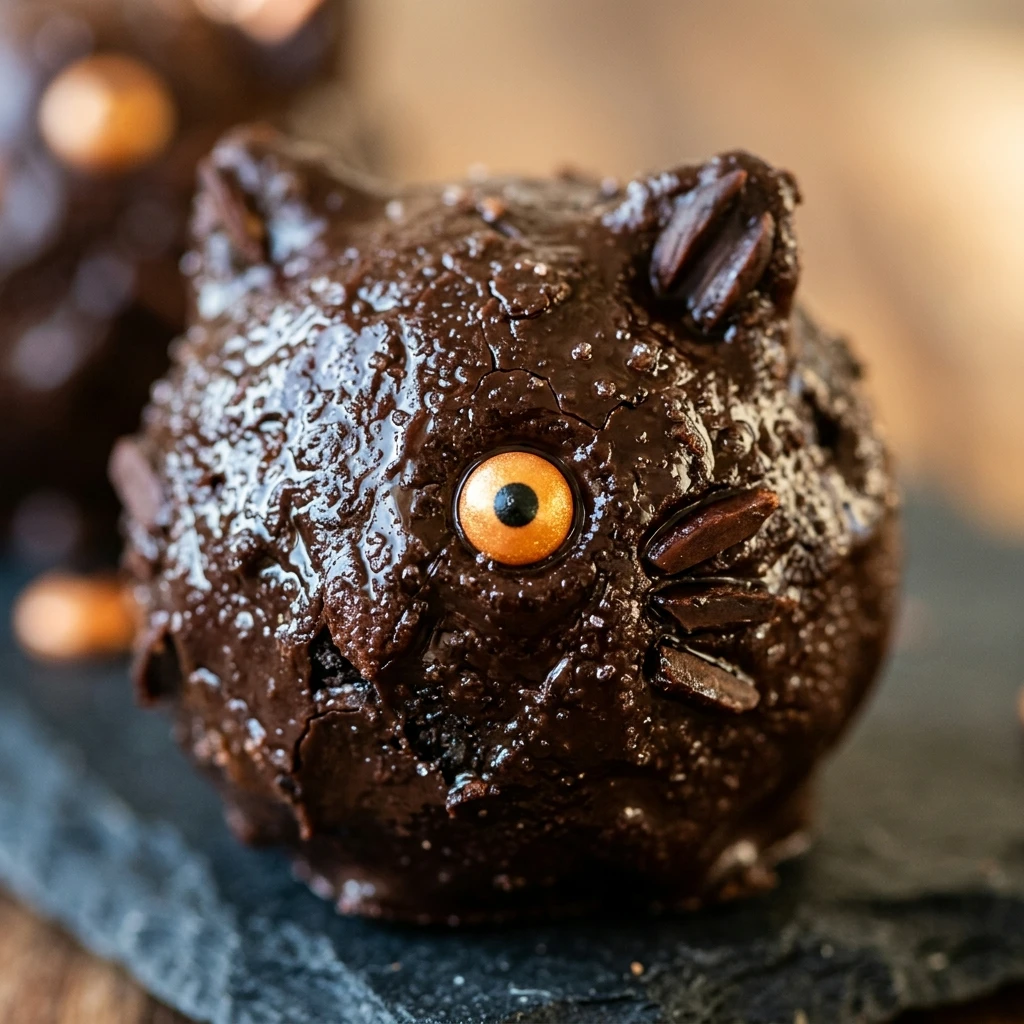
Spooky season is just around the corner, and these Black Cat Oreo Balls are the ultimate no-bake treat to get everyone in the Halloween spirit. Imagine the classic, creamy Oreo truffle you love, but transformed into adorable, glowing-eyed felines that are almost too cute to eat. Whether you are hosting a haunted house party or just want a fun kitchen project with the kids, these little treats are guaranteed to be the star of the dessert table. They require only a handful of ingredients and absolutely zero oven time, making them a stress-free addition to your festive spread.
Recipe Information
- Prep Time: 30 minutes
- Cook Time: 0 minutes (plus 1 hour chilling time)
- Total Time: 1 hour 30 minutes
- Servings: 24 Oreo balls
- Difficulty: Easy
Nutrition values
- Calories: 165 kcal
- Protein: 1.5g
- Carbs: 22g
Why Make This Black Cat Oreo Balls Recipe
This recipe is a must-have for your Halloween repertoire because it combines simplicity with high-impact presentation. You don’t need to be a professional pastry chef to create these professional-looking treats. The rich chocolate flavor paired with the tangy cream cheese creates a crowd-pleasing texture that appeals to both children and adults. Plus, since they are bite-sized, they are the perfect finger food for parties where guests are mingling. Best of all, you can make them a day in advance, saving you precious time on the day of your event.
Ingredients
- 36 Oreo cookies (standard size, not Double Stuf)
- 8 oz cream cheese, softened to room temperature
- 12 oz black candy melts or dark chocolate melting wafers
- 48 candy eyeballs
- 48 chocolate chips (for the ears)
- Small pink heart sprinkles (for the noses) or pink icing
- Black licorice strings or chocolate sprinkles (for whiskers)
Directions
Step 1: Preparation and Crushing
Place the Oreo cookies into a food processor and pulse until they become fine crumbs. Ensure there are no large chunks remaining. If you don’t have a food processor, place the cookies in a heavy-duty freezer bag and crush them with a rolling pin. In a large mixing bowl, combine the cookie crumbs with the softened cream cheese. Use a hand mixer or a sturdy spatula to blend the two until a thick, uniform dough forms with no white streaks of cream cheese visible.
Step 2: Shaping and Chilling
Line a large baking sheet with parchment paper or a silicone mat. Scoop about one tablespoon of the mixture and roll it between your palms to form a smooth ball, roughly one inch in diameter. Place the ball on the prepared baking sheet. Repeat this process until all the dough is used. Once the sheet is full, place it in the refrigerator for at least 30 to 60 minutes. Chilling is crucial because it firms up the balls, making them much easier to dip in the warm chocolate without falling apart.
Step 3: Dipping and Decorating
Melt the black candy melts in a microwave-safe bowl in 30-second intervals, stirring between each, until completely smooth. Remove one Oreo ball from the fridge at a time. Use a fork to dip the ball into the melted chocolate, tapping off the excess. Place it back on the parchment paper. While the coating is still wet, quickly press two chocolate chips on top for ears, two candy eyes on the front, and a pink sprinkle for the nose. If using whiskers, tuck them in near the nose. Repeat for all balls and let them sit at room temperature until the chocolate shell is completely hardened.
Expert Tips for Perfect Black Cat Oreo Balls Recipe
For the smoothest finish, make sure your cream cheese is truly at room temperature before mixing. Cold cream cheese will result in lumpy dough. When dipping, use a dedicated dipping tool or a fork to let the excess chocolate drip off; this prevents a “puddle” of chocolate from forming at the base of your cats. If the chocolate starts to thicken as you work, pop it back in the microwave for 10 seconds to loosen it up. If your kitchen is warm, keep the undipped balls in the fridge and only take out a few at a time to keep them firm.
Delicious Variations
While the classic Oreo is a winner, you can easily swap them for Golden Oreos to create “Yellow Tabby” cats or Mint Oreos for a refreshing twist. If you cannot find black candy melts, use dark chocolate chips and add a drop of black oil-based food coloring (avoid water-based coloring as it will seize the chocolate). You can also use peanut butter chips for the ears to add a different flavor profile, or use white chocolate to make spooky “Ghost Cats” for a varied Halloween platter.
Frequently Asked Questions
How should I store these Oreo balls?
Store the finished Oreo balls in an airtight container in the refrigerator. They will stay fresh and delicious for up to 5 to 7 days.

Can I freeze Black Cat Oreo Balls?
Yes! You can freeze them for up to 2 months. It is best to freeze them before decorating, but fully decorated ones can be frozen too. Just be aware that the candy eyes might “sweat” or bleed slightly when thawing.
Why is my chocolate coating cracking?
Cracking usually happens if the Oreo balls are extremely cold and the chocolate is very hot. Try letting the chilled balls sit at room temperature for 5 minutes before dipping to reduce the temperature shock.
What can I use if I don’t have a food processor?
A Ziploc bag and a rolling pin or a heavy pan work perfectly. Just make sure you crush the cookies into the finest dust possible for the best texture.
Can I use low-fat cream cheese?
It is recommended to use full-fat brick cream cheese. Low-fat or spreadable cream cheese from a tub has a higher moisture content and can make the dough too soft and difficult to shape.
Conclusion
These Black Cat Oreo Balls are as delicious as they are charming. They offer the perfect blend of crunchy chocolate coating and a rich, truffle-like interior that melts in your mouth. By following these simple steps, you will have a festive treat that looks like it came from a high-end bakery but was actually made right in your own kitchen. Set them out at your next October gathering and watch them disappear faster than a ghost in the night!


Black Cat Oreo Balls Recipe
- Total Time: 1 hour 30 minutes
- Diet: Vegetarian
Ingredients
- 36 Oreo cookies (standard size, not Double Stuf)
- 8 oz cream cheese, softened to room temperature
- 12 oz black candy melts or dark chocolate melting wafers
- 48 candy eyeballs
- 48 chocolate chips (for the ears)
- Small pink heart sprinkles (for the noses) or pink icing
- Black licorice strings or chocolate sprinkles (for whiskers)
Instructions
- Place the Oreo cookies into a food processor and pulse until they become fine crumbs. Ensure there are no large chunks remaining. If you don’t have a food processor, place the cookies in a heavy-duty freezer bag and crush them with a rolling pin. In a large mixing bowl, combine the cookie crumbs with the softened cream cheese. Use a hand mixer or a sturdy spatula to blend the two until a thick, uniform dough forms with no white streaks of cream cheese visible.
- Line a large baking sheet with parchment paper or a silicone mat. Scoop about one tablespoon of the mixture and roll it between your palms to form a smooth ball, roughly one inch in diameter. Place the ball on the prepared baking sheet. Repeat this process until all the dough is used. Once the sheet is full, place it in the refrigerator for at least 30 to 60 minutes. Chilling is crucial because it firms up the balls, making them much easier to dip in the warm chocolate without falling apart.
- Melt the black candy melts in a microwave-safe bowl in 30-second intervals, stirring between each, until completely smooth. Remove one Oreo ball from the fridge at a time. Use a fork to dip the ball into the melted chocolate, tapping off the excess. Place it back on the parchment paper. While the coating is still wet, quickly press two chocolate chips on top for ears, two candy eyes on the front, and a pink sprinkle for the nose. If using whiskers, tuck them in near the nose. Repeat for all balls and let them sit at room temperature until the chocolate shell is completely hardened.
- Cook Time: 1 hour 30 minutes