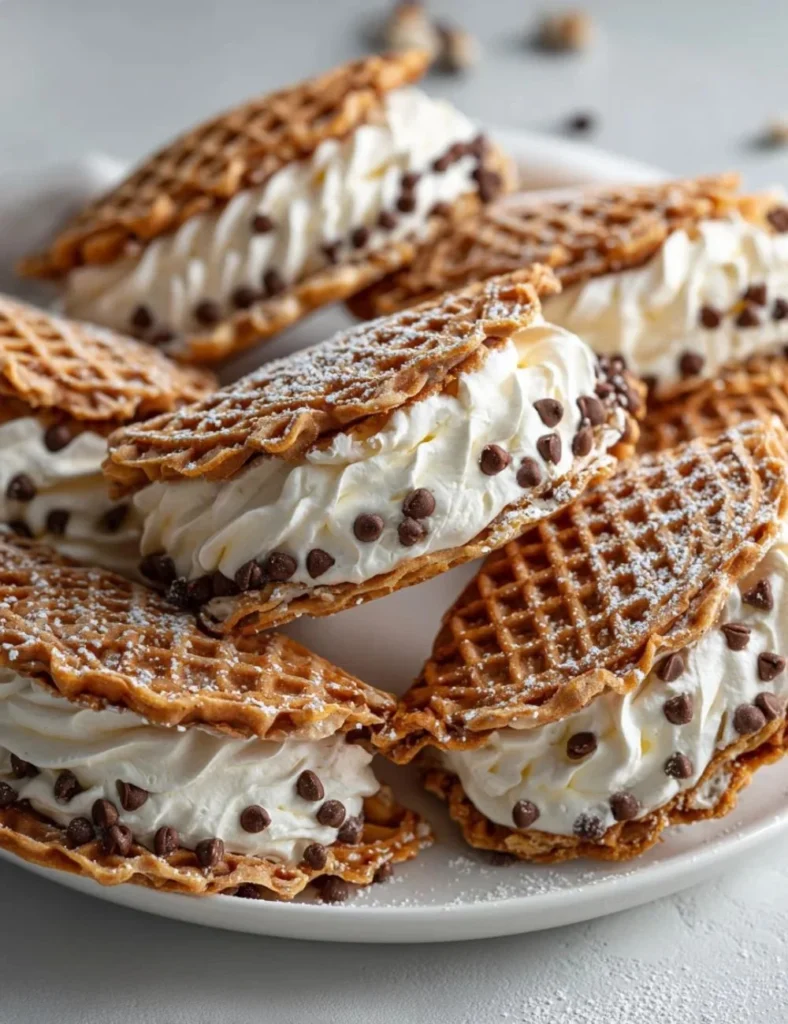
These chocolate pizzelles dress up the classic Italian cookie with a rich cocoa batter and a lusciously creamy cannoli-style filling. The contrast of crisp, wafer-thin pizzelles and smooth ricotta-mascarpone cream makes each bite both light and indulgent. You’ll smell warm cocoa and butter as they cook, and the filling adds a cool, sweet finish with tiny bursts of chocolate if you add chips.
Recipe Information
- Prep Time: 20 minutes
- Cook Time: 15 minutes
- Total Time: 35 minutes
- Servings: 12 filled pizzelle sandwiches
- Difficulty Level: Medium
Nutrition Information
(Approximate per serving)
- Calories per serving: 260 kcal
- Protein: 4 g
- Carbohydrates: 27 g
- Fat: 14 g
- Fiber: 2 g
- Sugar: 16 g
- Sodium: 70 mg
Why Make This Decadent Chocolate Pizzelles with Creamy Cannoli Filling
These pizzelles are a lovely mix of textures and flavors. The crisp, thin cookies have a deep chocolate aroma and a delicate crunch. The ricotta-mascarpone filling is silky, slightly tangy, and sweet—perfect against the cocoa biscuit. Make them for holiday gatherings, an impressive dessert tray, or a cozy weekend treat. They look elegant yet use simple ingredients and basic tools.
How to Make Decadent Chocolate Pizzelles with Creamy Cannoli Filling
You’ll measure, whisk, cook the pizzelles in a pizzelle iron, then whip the filling and assemble. Work in batches while the iron is hot. To keep the pizzelles crisp, cool them on a wire rack before filling. If you want softer cookies, fill them while slightly warm for a melded texture. Small tips: don’t overmix the batter, and scrape the bowl with a spatula so no dry pockets remain.
Ingredients:
- 1 cup all-purpose flour
- 1/2 cup unsweetened cocoa powder
- 1/2 cup granulated sugar
- 1/4 cup powdered sugar
- 2 large eggs
- 1/2 cup melted butter
- 1 teaspoon vanilla extract
- 1/2 teaspoon baking powder
- 1 cup ricotta cheese
- 1/2 cup mascarpone cheese
- 1/2 cup powdered sugar
- 1 teaspoon vanilla extract
- Mini chocolate chips (optional)
Directions:
Step 1: Preparation
In a medium bowl, whisk together the flour, cocoa powder, granulated sugar, and baking powder so they are evenly mixed. In another bowl, beat the eggs lightly and stir in the melted butter and 1 teaspoon vanilla extract. Have your pizzelle maker plugged in and ready to preheat while you finish the batter.
Step 2: Mixing
Pour the wet ingredients into the dry ingredients. Stir gently with a spatula or whisk until just combined — small lumps are fine. Avoid overmixing to keep the pizzelles tender. Scrape the batter into a small bowl or measuring cup for easy spooning.
Step 3: Cooking
Preheat your pizzelle maker according to the manufacturer’s instructions. When hot, drop about a tablespoon of batter into the center of each mold. Close the lid and cook until the pizzelle release and turn a deep golden-brown — usually 30 seconds to 1½ minutes depending on your iron. Remove the pizzelles carefully and lay them on a wire rack to cool completely; this keeps them crisp.
Step 4: Finishing
In a separate bowl, beat the ricotta, mascarpone, 1/2 cup powdered sugar, and 1 teaspoon vanilla extract until smooth and creamy. Taste and adjust sweetness if needed. Once the pizzelles are cool, spread a thin layer of filling on one pizzelle, top with another, and gently press to make a sandwich. Sprinkle mini chocolate chips on the filling or surface if you like. Serve immediately or chill briefly to set.
How to Serve Decadent Chocolate Pizzelles with Creamy Cannoli Filling
Serve them on a pretty platter as finger desserts. They pair well with espresso, sweet dessert wine, or a scoop of vanilla gelato. For a party, stack them on a tiered tray. For a romantic touch, dust with a little extra powdered sugar or drizzle melted chocolate over the top.
How to Store Decadent Chocolate Pizzelles with Creamy Cannoli Filling
- Assembled (filled) pizzelles: Store in an airtight container in the refrigerator for up to 2 days. The filling will soften the cookies over time.
- Unfilled pizzelles: Keep in an airtight container at room temperature for up to 3 days to stay crisp.
- Freezing: Freeze unfilled pizzelles in a single layer on a baking sheet, then transfer to a freezer bag for up to 1 month. Thaw at room temperature and re-crisp in a warm oven (250°F/120°C for 5–7 minutes) if needed. Do not freeze filled pizzelles — the filling changes texture on thawing.
Expert Tips for Perfect Decadent Chocolate Pizzelles with Creamy Cannoli Filling
- Preheat fully: A hot pizzelle iron gives even color and crisp edges.
- Measure accurately: Cocoa and flour ratios affect texture. Spoon and level flour to avoid a dense batter.
- Don’t overmix: Overworking flour develops gluten and makes the cookies tough.
- Cool on a wire rack: This prevents steam from softening the pizzelles.
- Keep filling light: If your filling seems runny, chill it for 15–20 minutes so it firms slightly and is easier to spread.
- Make ahead: You can make pizzelles one day ahead and fill the next day to maintain crispness.
- Substitutions: Use gluten-free 1:1 flour for a GF version (texture may vary). Swap melted butter for melted coconut oil for a slightly different aroma. For a lighter filling, use part-skim ricotta or replace mascarpone with cream cheese mixed with a few tablespoons of heavy cream.
Delicious Variations
- Orange-chocolate: Add 1 teaspoon of orange zest to the batter and a splash of orange liqueur to the filling.
- Espresso kick: Stir 1 teaspoon instant espresso powder into the batter for a mocha flavor.
- Nut-studded: Fold chopped toasted hazelnuts into the filling for crunch.
- Mint-chocolate: Add 1/2 teaspoon peppermint extract to the filling and use chocolate chips for contrast.
- Fruit-topped: Add a thin layer of raspberry jam between the filling and one pizzelle for a fruity note.
Frequently Asked Questions
-
How many pizzelles will this recipe make?
- You should get about 24 plain pizzelles (12 filled sandwiches) depending on your pizzelle iron size and how much batter you use per cookie. Use less batter for more delicate cookies.
-
How do I keep the pizzelles crisp after filling?
- Fill just before serving and store filled sandwiches in the fridge. If you want to keep them crisp, store unfilled pizzelles at room temperature and fill right before serving.
-
Can I make the filling ahead of time?
- Yes. Make the ricotta-mascarpone filling up to 3 days ahead and keep it chilled in an airtight container. Whisk briefly before using to lighten it.
-
Why are my pizzelles chewy instead of crisp?
- Common causes: undercooking, too-thick batter, or storing them while still warm (steam softens them). Cook until golden and cool on a wire rack before storing.
-
Can I use cream cheese instead of ricotta?
- Yes. Replace ricotta + mascarpone with 8 oz (225 g) cream cheese plus 2–3 tablespoons heavy cream to reach a similar texture. Sweeten to taste.
-
Is there a way to make these nut-free or dairy-free?
- For nut-free: keep ingredients as listed unless adding nuts. For dairy-free: use dairy-free ricotta alternatives and a vegan butter substitute; texture and flavor will change but the concept still works.
-
What if I don’t have a pizzelle maker?
- A thin-waffle iron can work in a pinch, but the pattern and thinness will differ. You can also bake thin cookies on a baking sheet, though they will be thicker and require a different time.
Conclusion
These Decadent Chocolate Pizzelles with Creamy Cannoli Filling make a lovely, textural dessert: crisp, chocolatey cookies wrapped around a silky, sweet filling. They taste of deep cocoa and smooth ricotta with a hint of vanilla, and they look beautiful on any dessert plate. If you want to compare a similar take that uses cream cheese in the filling, check out Chocolate Pizzelles with Cream Cheese Cannoli Filling – No Plate …. Give them a try — they’re easier than they look and always a crowd-pleaser.
Print
Decadent Chocolate Pizzelles with Creamy Cannoli Filling
- Total Time: 35 minutes
- Yield: 12 filled pizzelle sandwiches 1x
- Diet: Vegetarian
Description
These chocolate pizzelles feature a rich cocoa batter and a creamy cannoli-style filling, offering a delightful contrast of textures and flavors.
Ingredients
- 1 cup all-purpose flour
- 1/2 cup unsweetened cocoa powder
- 1/2 cup granulated sugar
- 1/4 cup powdered sugar
- 2 large eggs
- 1/2 cup melted butter
- 1 teaspoon vanilla extract
- 1/2 teaspoon baking powder
- 1 cup ricotta cheese
- 1/2 cup mascarpone cheese
- 1/2 cup powdered sugar for filling
- 1 teaspoon vanilla extract for filling
- Mini chocolate chips (optional)
Instructions
- In a medium bowl, whisk together the flour, cocoa powder, granulated sugar, and baking powder. In another bowl, beat the eggs and stir in the melted butter and 1 teaspoon vanilla extract.
- Pour the wet ingredients into the dry ingredients and stir gently until just combined.
- Preheat your pizzelle maker. Drop about a tablespoon of batter into each mold and cook until deep golden-brown, about 30 seconds to 1½ minutes.
- Let the pizzelles cool on a wire rack.
- In a separate bowl, beat the ricotta, mascarpone, powdered sugar, and vanilla extract until smooth. Spread a thin layer of filling on one pizzelle, top with another, and gently press to make a sandwich.
- Serve immediately or chill briefly to set.
Notes
Store filled pizzelles in an airtight container in the refrigerator for up to 2 days. Unfilled pizzelles can be kept at room temperature for up to 3 days.
- Prep Time: 20 minutes
- Cook Time: 15 minutes
- Category: Dessert
- Method: Pizzelle Maker
- Cuisine: Italian
Nutrition
- Serving Size: 1 filled pizzelle sandwich
- Calories: 260
- Sugar: 16g
- Sodium: 70mg
- Fat: 14g
- Saturated Fat: 8g
- Unsaturated Fat: 6g
- Trans Fat: 0g
- Carbohydrates: 27g
- Fiber: 2g
- Protein: 4g
- Cholesterol: 80mg