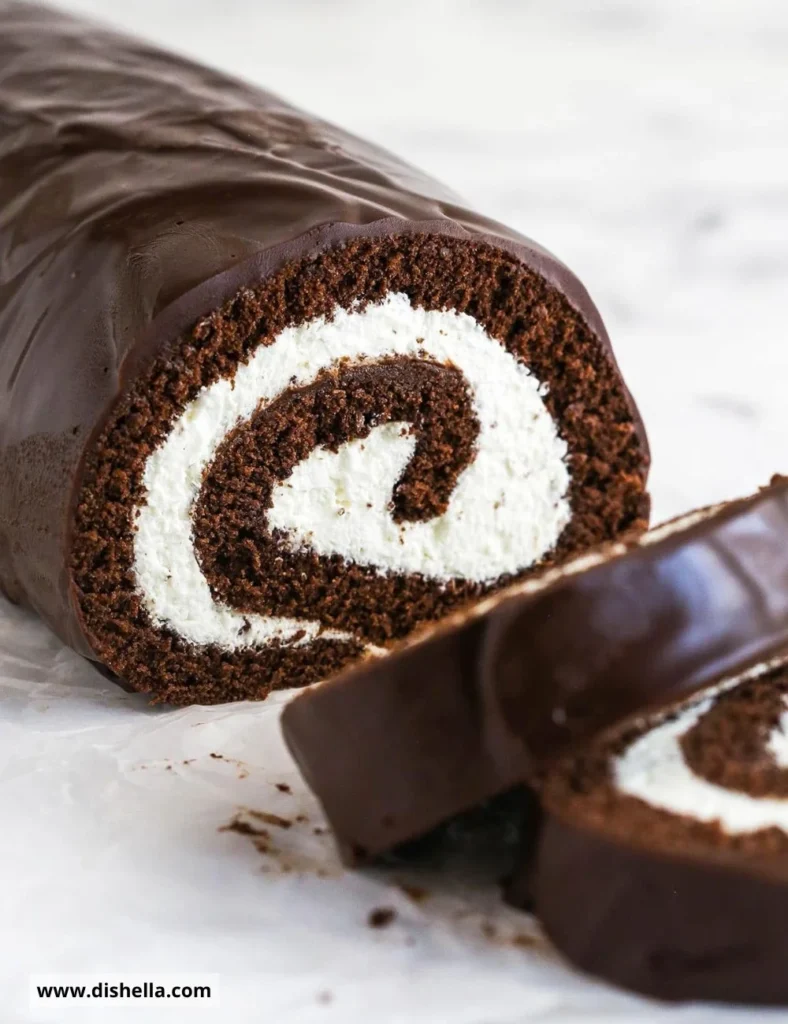
Chocolate Swiss Roll is a delightful dessert that combines the rich flavors of chocolate with a soft, fluffy sponge cake. This classic treat is perfect for any occasion, whether you’re celebrating a birthday, hosting a tea party, or simply indulging yourself after a long day. Its beautiful spiral appearance adds a touch of elegance to your dessert table, making it not only delicious but visually appealing as well. Let’s uncover how easy it is to create this fantastic dessert at home!
Recipe Information
- Prep Time: 20 minutes
- Cook Time: 12 minutes
- Total Time: 32 minutes
- Servings: 8
- Difficulty Level: Easy
Nutrition Information
- Calories per serving: 210
- Protein: 3g
- Carbohydrates: 30g
- Fat: 9g
- Fiber: 1g
- Sugar: 16g
- Sodium: 90mg
Why Make This Chocolate Swiss Roll
Making a Chocolate Swiss Roll at home is not only satisfying but also allows you to impress friends and family with your baking skills. This dessert strikes a perfect balance between a light sponge and rich chocolate fillings, creating a heavenly combination in every bite. It’s customizable and versatile; you can serve it plain or dress it up with whipped cream, fresh fruits, or even a drizzle of caramel. Plus, it’s a fun baking project that the whole family can get involved in!
How to Make Chocolate Swiss Roll
Creating a Chocolate Swiss Roll might seem intimidating, but with clear steps, you’ll find it’s quite manageable. The secret lies in rolling the sponge cake while it’s still warm, which helps it maintain its shape without cracking. Gather your ingredients, and let’s dive into the process!
Ingredients:
- 4 large eggs
- 100g granulated sugar
- 75g all-purpose flour
- 25g unsweetened cocoa powder
- 1 teaspoon baking powder
- Pinch of salt
- 100g dark chocolate, melted
- 100ml heavy cream
- Powdered sugar (for dusting)
Directions:
Step 1: Preparation
Preheat the oven to 180°C (350°F). Grease and line a baking tray with parchment paper to ensure your cake doesn’t stick.
Step 2: Mixing
In a mixing bowl, whisk together the large eggs and granulated sugar until thick and pale in color. This should take about 5 minutes and will aerate the mixture, contributing to a light cake.
Step 3: Cooking
Next, sift in the all-purpose flour, unsweetened cocoa powder, baking powder, and a pinch of salt. Gently fold the dry ingredients into the egg mixture until just combined. Careful mixing will help keep the air in the batter. Spread the mixture evenly onto the prepared baking tray and bake for 10-12 minutes, or until the cake is springy to the touch.
Step 4: Finishing
Once baked, quickly turn the cake out onto a clean kitchen towel dusted with powdered sugar. Roll up the cake with the towel while it’s still warm and allow it to cool completely while rolled. This will help it hold its shape better when it’s filled. After cooling, whip the heavy cream until soft peaks form. Unroll the cooled cake, spread the melted dark chocolate evenly over it, and top with the whipped cream. Carefully roll the cake back up without the towel and refrigerate for at least 30 minutes. Before slicing, dust with powdered sugar to add a beautiful finishing touch.
How to Serve Chocolate Swiss Roll
Serve your Chocolate Swiss Roll chilled or at room temperature. It can be enjoyed on its own or paired with a scoop of vanilla ice cream or fresh berries for added flavor and texture. This dessert makes for a delightful end to any meal or a sweet treat to accompany coffee or tea.
How to Store Chocolate Swiss Roll
To store your Chocolate Swiss Roll, wrap it tightly in plastic wrap and place it in the refrigerator. It will keep well for about 3-4 days. For longer storage, you can freeze the roll wrapped in plastic and then in foil for up to 2 months. When ready to eat, thaw in the fridge overnight before serving.
Expert Tips for Perfect Chocolate Swiss Roll
- Temperature Control: Make sure your eggs are at room temperature for better incorporation and volume.
- Be Gentle: When folding in the dry ingredients, be gentle to retain the bubbles in the batter for a light and airy cake.
- Dusting: Always dust your kitchen towel with powdered sugar to prevent sticking when rolling the cake.
- Creative Fillings: Feel free to add flavor variations to the whipped cream, such as vanilla extract or a splash of liqueur for an adult twist.
Delicious Variations
- Fruit-Filled: Swap out some of the whipped cream for fresh fruits such as raspberries or strawberries for a tangy burst.
- Coffee Lover: Blend in some instant coffee to the whipped cream for a mocha flavor.
- Nutty Delight: Add crushed nuts within the filling for an extra crunch.
Frequently Asked Questions
- Can I use cake mix for chocolate swiss roll?
Yes, you can use chocolate cake mix instead of making a batter from scratch, adjusting the liquid as per mix instructions. However, it may not give the same texture as homemade. - What can I do if my cake cracks when rolling?
If your cake cracks, don’t worry! You can simply patch it up with the filling when you roll it back, or cover it with a thick layer of whipped cream or ganache. - Can I make this roll gluten-free?
Yes, you can use gluten-free all-purpose flour instead of regular flour for a gluten-free version. - How do I known when the cake is done baking?
The cake should spring back when touched lightly in the center. A toothpick inserted should come out clean or with a few moist crumbs. - Can I prepare this a day ahead?
Absolutely! The Swiss Roll can be made a day in advance. Just ensure to keep it wrapped tightly in the refrigerator to maintain its freshness.
Conclusion
Making a Chocolate Swiss Roll is an enjoyable and rewarding experience that yields a stunning and delicious dessert. This cake beautifully blends the fluffy sponge and rich chocolate, making it a perfect treat for any gathering or a special everyday indulgence. So why not give it a try? Your taste buds will thank you as you roll into this blissful chocolate experience!
Print
Chocolate Swiss Roll
- Total Time: 32 minutes
- Yield: 8 servings 1x
- Diet: Vegetarian
Description
A delightful dessert combining rich chocolate flavors with a soft, fluffy sponge cake, perfect for any occasion.
Ingredients
- 4 large eggs
- 100g granulated sugar
- 75g all-purpose flour
- 25g unsweetened cocoa powder
- 1 teaspoon baking powder
- Pinch of salt
- 100g dark chocolate, melted
- 100ml heavy cream
- Powdered sugar (for dusting)
Instructions
- Preheat the oven to 180°C (350°F). Grease and line a baking tray with parchment paper.
- In a mixing bowl, whisk together the large eggs and granulated sugar until thick and pale in color (about 5 minutes).
- Sift in the flour, cocoa powder, baking powder, and salt. Gently fold until just combined. Spread evenly onto the prepared tray and bake for 10-12 minutes.
- Turn the baked cake onto a powdered sugar-dusted towel and roll it up while warm. Allow to cool completely.
- Whip the heavy cream until soft peaks form. Unroll the cooled cake, spread melted chocolate, and whipped cream. Roll it back up and refrigerate for at least 30 minutes.
- Before slicing, dust with powdered sugar.
Notes
Temperature-controlled eggs and gentle mixing are key for the perfect texture. Customize your filling with fruits or flavored whipped cream.
- Prep Time: 20 minutes
- Cook Time: 12 minutes
- Category: Dessert
- Method: Baking
- Cuisine: French
Nutrition
- Serving Size: 1 serving
- Calories: 210
- Sugar: 16g
- Sodium: 90mg
- Fat: 9g
- Saturated Fat: 4g
- Unsaturated Fat: 4g
- Trans Fat: 0g
- Carbohydrates: 30g
- Fiber: 1g
- Protein: 3g
- Cholesterol: 186mg