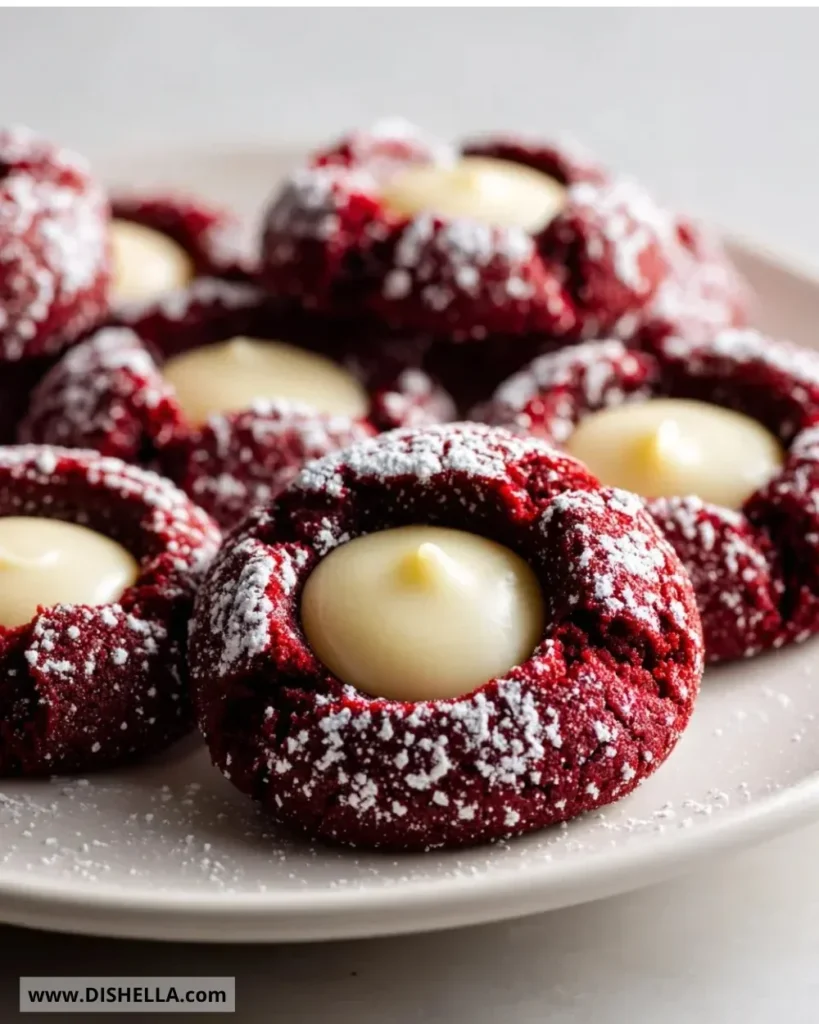
Freshly baked Red Velvet Cream Cheese Thumbprint Cookies are the perfect blend of rich, velvety flavor and a creamy burst of sweetness. These delightful treats not only look beautiful with their striking red color and creamy filling, but they also offer a delightful texture that melts in your mouth. Whether you’re baking for a special occasion or wanting to impress family and friends during an afternoon tea, these cookies are sure to be a showstopper.
Recipe Information
- Prep Time: 20 minutes
- Cook Time: 12 minutes
- Total Time: 32 minutes
- Servings: 24 cookies
- Difficulty Level: Easy
Nutrition Information
- Calories per serving: 150
- Protein: 2 g
- Carbohydrates: 20 g
- Fat: 7 g
- Fiber: 0 g
- Sugar: 9 g
- Sodium: 80 mg
Why Make This Red Velvet Cream Cheese Thumbprint Cookies
These cookies are a delightful twist on the classic thumbprint cookie. The vibrant red velvet of the cookie pairs beautifully with the rich cream cheese filling, making them visually stunning as well as delicious. Perfect for celebrations such as Valentine’s Day, Christmas, or any gathering where you want to impress, these cookies are sure to evoke joy and delight with every bite. Moreover, the addition of cream cheese adds a perfect tangy flavor that balances the sweetness of the cookie, making each cookie an irresistible combination of flavor and texture.
How to Make Red Velvet Cream Cheese Thumbprint Cookies
Step 1: Preparation
Preheat your oven to 350°F (175°C) and prepare a baking sheet by lining it with parchment paper to prevent sticking. This small preparation step is crucial for achieving perfectly baked cookies that come off the sheet easily.
Step 2: Mixing
In a medium bowl, whisk together the all-purpose flour, cocoa powder, baking soda, and salt. This dry mixture forms the foundation of your cookies. In a large bowl, cream the softened unsalted butter with granulated sugar and brown sugar until the mixture is light and fluffy. This aeration will give your cookies a lovely texture. Once creamy, add the large egg, red food coloring, and vanilla extract to the butter mixture, mixing well until everything is combined.
Step 3: Cooking
Gradually incorporate the flour mixture into the wet ingredients, mixing until just combined. The dough will be somewhat thick, which is perfect. Scoop small balls of dough and place them on the prepared baking sheet. Using your thumb, make an indentation in the center of each ball of dough. Bake in the preheated oven for 10-12 minutes, or until set. Allow the cookies to cool on the baking sheet slightly before transferring them to a wire rack.
Step 4: Finishing
In a small bowl, beat the softened cream cheese and powdered sugar together until smooth and creamy. This filling is the star of the show! Once the cookies are cooled, fill the thumbprint indentations with the cream cheese mixture. Take a moment to admire your beautiful creations before enjoying your delicious Red Velvet Cream Cheese Thumbprint Cookies!
How to Serve Red Velvet Cream Cheese Thumbprint Cookies
Serve these cookies on a festive platter for parties or enjoy them casually with a cup of coffee or tea. They also make a lovely dessert for holiday gatherings and can be paired with a scoop of vanilla ice cream for an extra indulgence.
How to Store Red Velvet Cream Cheese Thumbprint Cookies
Store the cookies in an airtight container at room temperature for up to 3 days. If you want to extend their shelf life, transfer them to the refrigerator, where they will stay fresh for up to a week. Before serving, allow them to come to room temperature to enhance their flavor and texture.
Expert Tips for Perfect Red Velvet Cream Cheese Thumbprint Cookies
- Make sure your butter is softened at room temperature for the best creaming results.
- Use gel food coloring for a more intense color without adding extra liquid.
- If you prefer a less sweet filling, you can reduce the powdered sugar in the cream cheese filling.
- Experiment by adding chocolate chips or nuts to the dough if you like a little crunch.
Delicious Variations
- Nutella Filled Thumbprints: Swap out the cream cheese filling for Nutella for a chocolaty twist.
- Lemon Cream Cheese Filling: Add some lemon juice and zest to the cream cheese mixture for a refreshing citrus flavor.
- Red Velvet Sandwich Cookies: Use two cookie halves and fill them with cream cheese to create a delightful sandwich.
Frequently Asked Questions
-
Can I make the dough ahead of time?
Yes, you can refrigerate the dough for up to 24 hours before baking. Just let it soften slightly before scooping and baking. -
What can I use instead of unsalted butter?
You may use salted butter; just reduce the added salt in the recipe to 1/4 teaspoon. -
Can I freeze these cookies?
Absolutely! Freeze the baked cookies in a single layer on a baking sheet, then transfer them to an airtight container. They will last about 2 months in the freezer. -
Is it okay to use liquid food coloring?
While gel food coloring provides a richer color, liquid food coloring can be used as well; just be mindful that it may alter the texture slightly. -
How can I make these gluten-free?
You can substitute the all-purpose flour with a 1:1 gluten-free baking blend for a gluten-free version of these cookies.
Conclusion
These Red Velvet Cream Cheese Thumbprint Cookies are not just cookies; they are a celebration of flavors and colors. With their rich taste, soft texture, and creamy filling, they are bound to be a hit at any gathering. Enjoy baking—and indulging—in these delicious cookies, and don’t be surprised if they become your new favorite treat!
Print
Red Velvet Cream Cheese Thumbprint Cookies
- Total Time: 32 minutes
- Yield: 24 cookies 1x
- Diet: Vegetarian
Description
Freshly baked Red Velvet Cream Cheese Thumbprint Cookies combine rich, velvety flavor with a creamy burst of sweetness. They’re visually stunning and perfect for any celebration.
Ingredients
- 2 ½ cups all-purpose flour
- 2 tbsp cocoa powder
- 1 tsp baking soda
- ½ tsp salt
- 1 cup unsalted butter, softened
- ¾ cup granulated sugar
- ¾ cup brown sugar
- 1 large egg
- 1 tbsp red food coloring
- 1 tsp vanilla extract
- 8 oz cream cheese, softened
- 1 cup powdered sugar
Instructions
- Preheat your oven to 350°F (175°C) and line a baking sheet with parchment paper.
- In a medium bowl, whisk together flour, cocoa powder, baking soda, and salt.
- In a large bowl, cream together butter, granulated sugar, and brown sugar until light and fluffy. Add egg, food coloring, and vanilla; mix well.
- Gradually incorporate the flour mixture into the wet ingredients, mixing until just combined.
- Scoop small balls of dough and place on the prepared baking sheet. Make an indentation in each ball using your thumb.
- Bake for 10-12 minutes or until set. Allow cooling slightly on the baking sheet before transferring to a wire rack.
- In a small bowl, beat cream cheese and powdered sugar until smooth. Fill the thumbprint indentations of cooled cookies with the cream cheese filling.
Notes
Store in an airtight container at room temperature for up to 3 days, or refrigerate for up to a week.
- Prep Time: 20 minutes
- Cook Time: 12 minutes
- Category: Dessert
- Method: Baking
- Cuisine: American
Nutrition
- Serving Size: 1 cookie
- Calories: 150
- Sugar: 9g
- Sodium: 80mg
- Fat: 7g
- Saturated Fat: 4g
- Unsaturated Fat: 2g
- Trans Fat: 0g
- Carbohydrates: 20g
- Fiber: 0g
- Protein: 2g
- Cholesterol: 30mg